
智能客服
常见问题
公众号
二维码
二维码

点标记用来在地图上标记任何位置,例如用户位置、车辆位置、店铺位置等一切带有位置属性的事物。
百度地图iOS SDK 提供的点标记功能包含两大部分,一部分是点(俗称Annotation)、另一部分是浮于点上方的信息窗体(俗称 PaopaoView)。同时,SDK对Annotation和PaopaoView封装了大量的触发事件,例如点击事件、长按事件、拖拽事件。
Annotation和 PaopaoView 有默认风格,同时也支持自定义。
iOS地图SDK预置了基本的标注点(BMKPointAnnotation)和一个大头针标注View(BMKPinAnnotationView),您可以直接使用来显示标注。
iOS地图SDK提供的大头针标注BMKPinAnnotationView,通过它可以设置大头针颜色、是否显示动画等。
BMKPointAnnotation* annotation = [[BMKPointAnnotation alloc]init];annotation.coordinate = CLLocationCoordinate2DMake(39.915, 116.404);//设置标注的标题annotation.title = @"北京";//副标题annotation.subtitle = @"天安门";[_mapView addAnnotation:annotation];
实现 <BMKMapViewDelegate> 协议中的 mapView:viewForAnnotation:回调函数,设置标注样式。代码如下所示:
#pragma mark - BMKMapViewDelegate- (BMKAnnotationView *)mapView:(BMKMapView *)mapView viewForAnnotation:(id <BMKAnnotation>)annotation{if ([annotation isKindOfClass:[BMKPointAnnotation class]]){static NSString *reuseIndetifier = @"annotationReuseIndetifier";BMKAnnotationView *annotationView = [mapView dequeueReusableAnnotationViewWithIdentifier:reuseIndetifier];if (annotationView == nil){annotationView = [[BMKAnnotationView alloc] initWithAnnotation:annotationreuseIdentifier:reuseIndetifier];}return annotationView;}return nil;}
在地图显示对应的标注点,点击标注弹出气泡,效果如图:

iOS 地图SDK可自定义标注(包括自定义标注图标和自定义气泡图标),均通过BMKAnnotationView来实现。
自定义标注图标
若大头针样式的标注不能满足您的需求,您可以自定义标注图标。代码如下:
#pragma mark - BMKMapViewDelegate- (BMKAnnotationView *)mapView:(BMKMapView *)mapView viewForAnnotation:(id <BMKAnnotation>)annotation{if ([annotation isKindOfClass:[BMKPointAnnotation class]]){static NSString *reuseIndetifier = @"annotationReuseIndetifier";BMKAnnotationView *annotationView = [mapView dequeueReusableAnnotationViewWithIdentifier:reuseIndetifier];if (annotationView == nil){annotationView = [[BMKAnnotationView alloc] initWithAnnotation:annotationreuseIdentifier:reuseIndetifier];}annotationView.image = [UIImage imageNamed:@"poi.png"];return annotationView;}return nil;}
效果如图:

添加自定义气泡
气泡在iOS中又称为PaopaoView,它由背景和气泡内容构成。
自定义气泡类完整代码如下:
#import <UIKit/UIKit.h>@interface CustomPaopaoView : UIView@property (nonatomic, strong) UIImage *image; //商户图@property (nonatomic, copy) NSString *title; //商户名@property (nonatomic, copy) NSString *subtitle; //地址@end#import "CustomPaopaoView.h"#define kPortraitMargin 5#define kPortraitWidth 50#define kPortraitHeight 50#define kTitleWidth 120#define kTitleHeight 20#define kArrorHeight 0@interface CustomPaopaoView ()@property (nonatomic, strong) UIImageView *portraitView;@property (nonatomic, strong) UILabel *subtitleLabel;@property (nonatomic, strong) UILabel *titleLabel;@end@implementation CustomPaopaoView#pragma mark - draw rect- (void)drawRect:(CGRect)rect{[self drawInContext:UIGraphicsGetCurrentContext()];self.layer.shadowColor = [[UIColor blackColor] CGColor];self.layer.shadowOpacity = 1.0;self.layer.shadowOffset = CGSizeMake(0.0f, 0.0f);}- (void)drawInContext:(CGContextRef)context{CGContextSetLineWidth(context, 2.0);CGContextSetFillColorWithColor(context, [UIColor colorWithRed:0.3 green:0.3 blue:0.3 alpha:0.8].CGColor);[self getDrawPath:context];CGContextFillPath(context);}- (void)getDrawPath:(CGContextRef)context{CGRect rrect = self.bounds;CGFloat radius = 6.0;CGFloat minx = CGRectGetMinX(rrect),midx = CGRectGetMidX(rrect),maxx = CGRectGetMaxX(rrect);CGFloat miny = CGRectGetMinY(rrect),maxy = CGRectGetMaxY(rrect)-kArrorHeight;CGContextMoveToPoint(context, midx+kArrorHeight, maxy);CGContextAddLineToPoint(context,midx, maxy+kArrorHeight);CGContextAddLineToPoint(context,midx-kArrorHeight, maxy);CGContextAddArcToPoint(context, minx, maxy, minx, miny, radius);CGContextAddArcToPoint(context, minx, minx, maxx, miny, radius);CGContextAddArcToPoint(context, maxx, miny, maxx, maxx, radius);CGContextAddArcToPoint(context, maxx, maxy, midx, maxy, radius);CGContextClosePath(context);}- (id)initWithFrame:(CGRect)frame{self = [super initWithFrame:frame];if (self) {self.backgroundColor = [UIColor clearColor];[self initSubViews];}return self;}- (void)initSubViews{// 添加图片,即商户图self.portraitView = [[UIImageView alloc] initWithFrame:CGRectMake(kPortraitMargin, kPortraitMargin, kPortraitWidth, kPortraitHeight)];self.portraitView.backgroundColor = [UIColor blackColor];[self addSubview:self.portraitView];// 添加标题,即商户名self.titleLabel = [[UILabel alloc] initWithFrame:CGRectMake(kPortraitMargin * 2 + kPortraitWidth, kPortraitMargin, kTitleWidth, kTitleHeight)];self.titleLabel.font = [UIFont boldSystemFontOfSize:14];self.titleLabel.textColor = [UIColor whiteColor];self.titleLabel.text = self.title;[self addSubview:self.titleLabel];// 添加副标题,即商户地址self.subtitleLabel = [[UILabel alloc] initWithFrame:CGRectMake(kPortraitMargin * 2 + kPortraitWidth, kPortraitMargin * 2 + kTitleHeight, kTitleWidth, kTitleHeight)];self.subtitleLabel.font = [UIFont systemFontOfSize:12];self.subtitleLabel.textColor = [UIColor lightGrayColor];self.subtitleLabel.text = self.subtitle;[self addSubview:self.subtitleLabel];}- (void)setTitle:(NSString *)title{self.titleLabel.text = title;}- (void)setSubtitle:(NSString *)subtitle{self.subtitleLabel.text = subtitle;}- (void)setImage:(UIImage *)image{self.portraitView.image = image;}@end
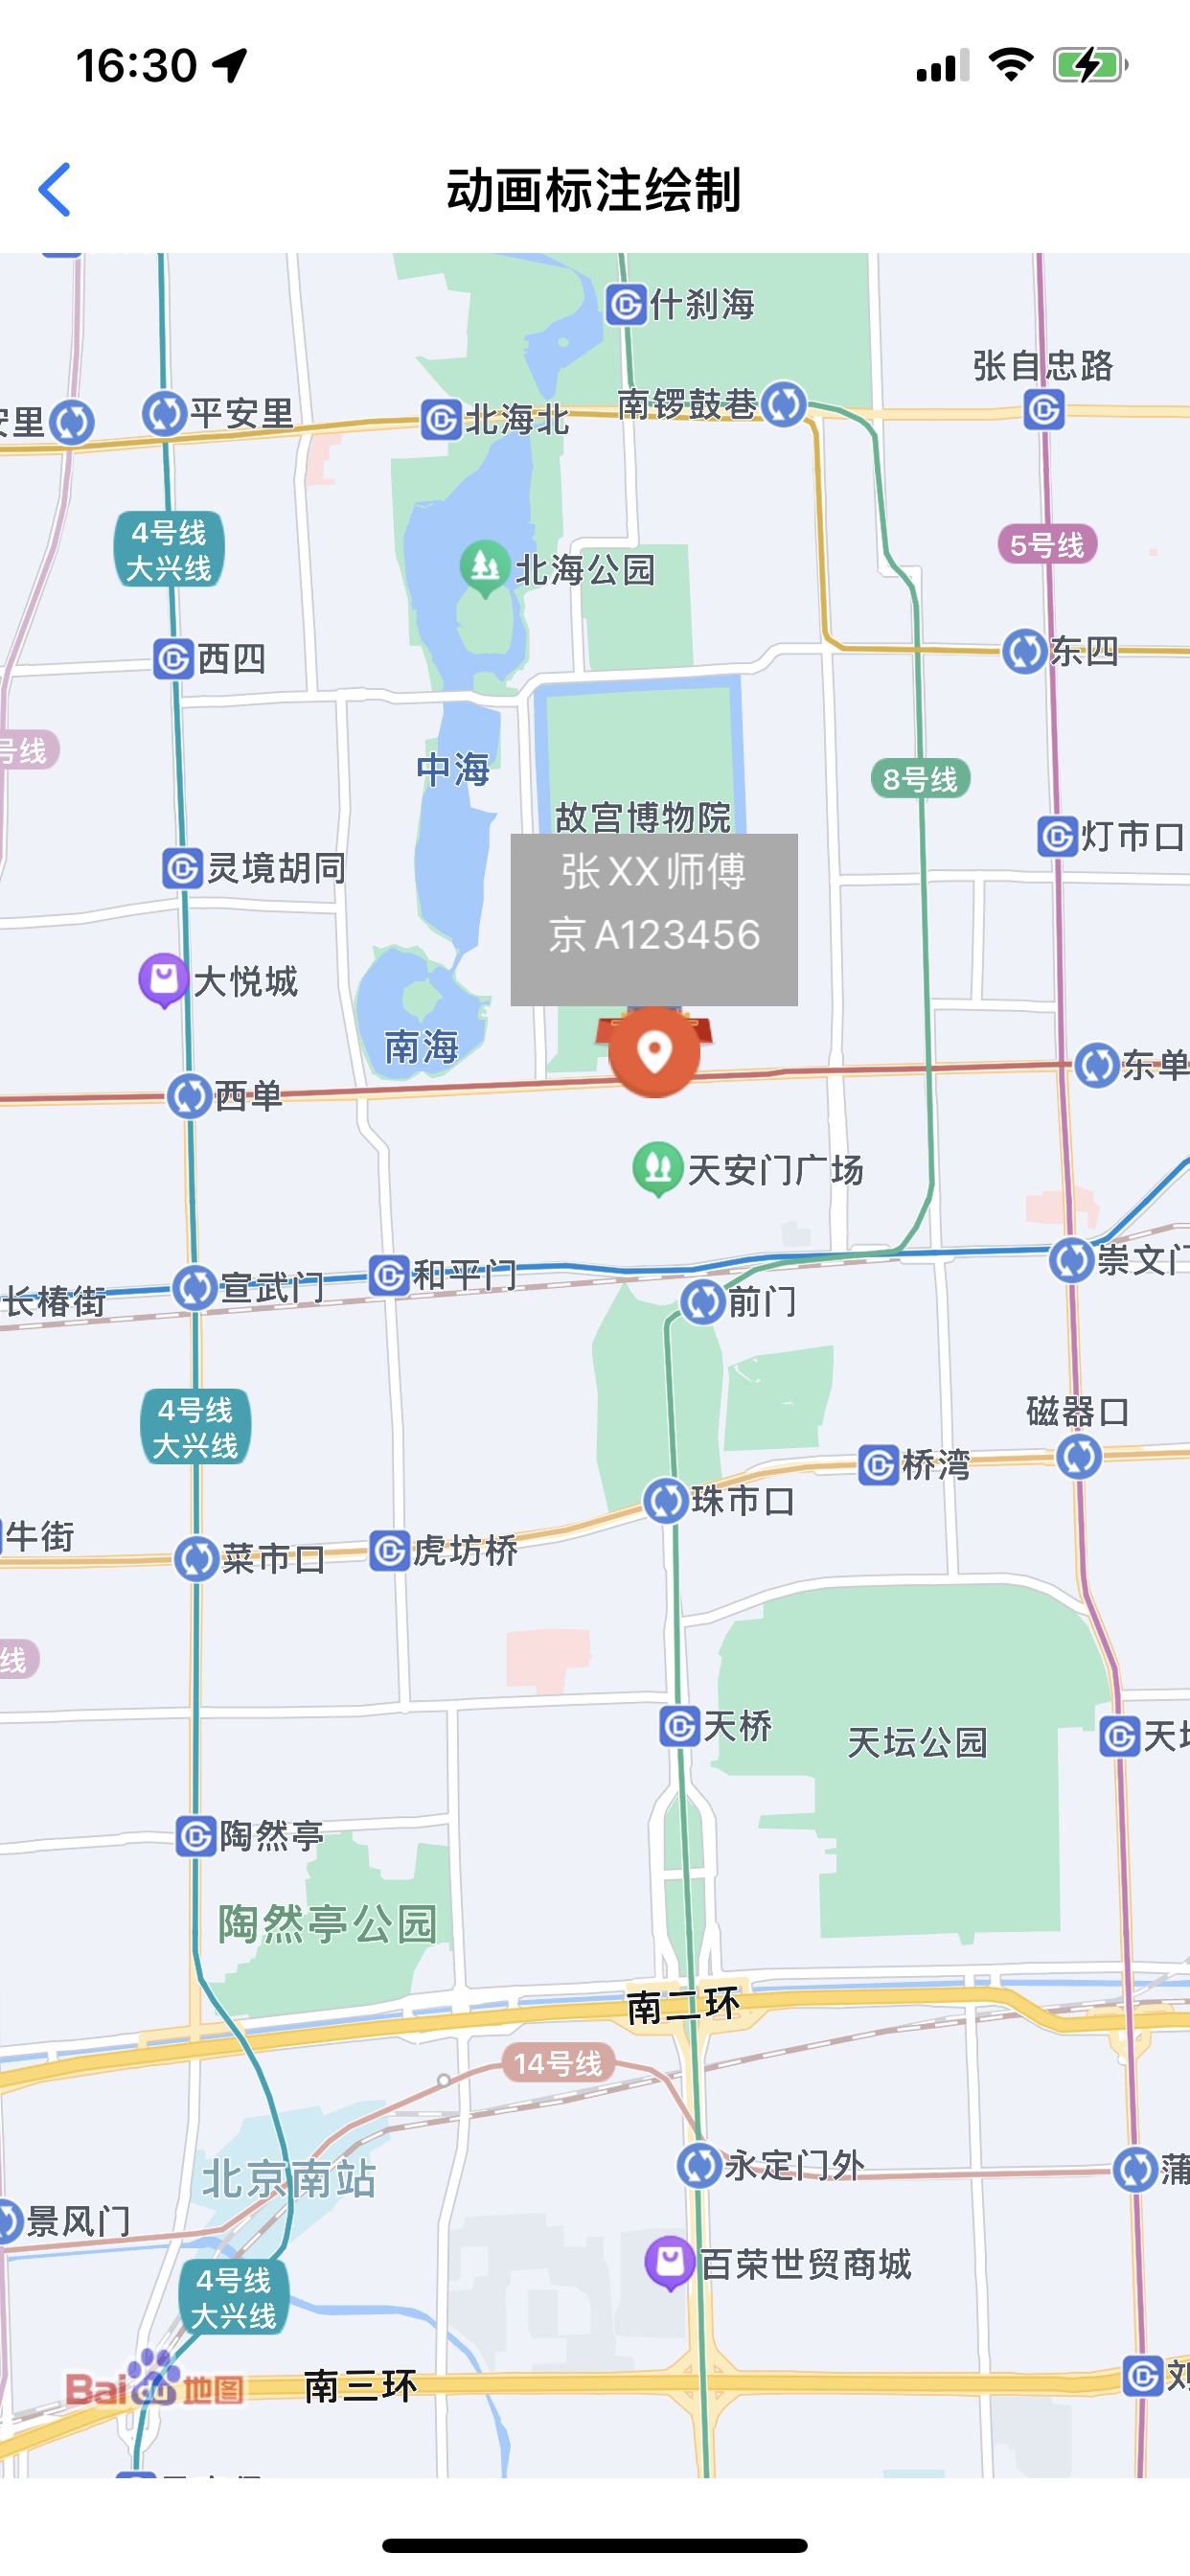
以上就是自定义气泡类的全部示例代码,在点击标注时实现弹出自定义的气泡的效果,还需要在BMKMapView的代理方法mapView: viewForAnnotation:设置自定义的paopaoView,完整代码如下:
#pragma mark - BMKMapViewDelegate- (BMKAnnotationView *)mapView:(BMKMapView *)mapView viewForAnnotation:(id <BMKAnnotation>)annotation{if ([annotation isKindOfClass:[BMKPointAnnotation class]]){static NSString *reuseIndetifier = @"annotationReuseIndetifier";BMKAnnotationView *annotationView = [mapView dequeueReusableAnnotationViewWithIdentifier:reuseIndetifier];if (annotationView == nil){annotationView = [[BMKAnnotationView alloc] initWithAnnotation:annotationreuseIdentifier:reuseIndetifier];}annotationView.image = [UIImage imageNamed:@"poi.png"];annotationView.canShowCallout = YES;CustomPaopaoView *customPopView = [[CustomPaopaoView alloc] init];customPopView.frame = CGRectMake(0, 0, 120.0f, 70.0f);customPopView.image = [UIImage imageNamed:@"poi.png"];customPopView.title = @"北京";customPopView.subtitle = @"天安门";BMKActionPaopaoView *pView = [[BMKActionPaopaoView alloc] initWithCustomView:customPopView];pView.backgroundColor = [UIColor lightGrayColor];pView.frame = customPopView.frame;annotationView.paopaoView = pView;return annotationView;}return nil;}
效果如图:
删除单个点标记
//删除指定的单个点标记[_mapView removeAnnotation:annotation];
批量添加Annotation
/***向地图窗口添加一组标注,需要实现BMKMapViewDelegate的-mapView:viewForAnnotation:函数来生成标注对应的View*@param annotations 要添加的标注数组*/[_mapView addAnnotations:annotations];
批量删除Annotation
/***移除一组标注*@param annotation 要移除的标注数组*/[_mapView removeAnnotations:annotations];
Since 6.5.0 iOS地图SDK起支持点标记碰撞策略功能
BMKAnnotationView新增以下属性,整体碰撞策略优先级:层级限制>强制展示>碰撞优先级>展示优先级>添加顺序
| 属性 | 类型 | 说明 |
|---|---|---|
| displayMaxLevel | float | 需要展示的最大级别,大于此级别则不展示,默认22。V6.5.0以后支持 |
| displayMinLevel | float | 需要展示的最小级别,小于此级别则不展示,默认4。V6.5.0以后支持 |
| isOpenCollisionDetection | BOOL | 开启碰撞检测,默认NO,关闭。V6.5.0以后支持 |
| collisionDetectionPriority | NSInteger | 碰撞检测优先级,同一优先级后添加的优先展示。V6.5.0以后支持,默认为0 |
| isForceDisplay | BOOL | 开启碰撞检测时,是否强制展示,默认NO。V6.5.0以后支持 |
NSMutableArray *annotations = [NSMutableArray array];for (NSInteger i = 0; i < 20; i++) {double lat = (arc4random() % 100) * 0.001;double lon = (arc4random() % 100) * 0.001;BMKPointAnnotation *annotation = [[BMKPointAnnotation alloc] init];annotation.coordinate = CLLocationCoordinate2DMake(_basicAnnotationCoordinate.latitude + lat, _basicAnnotationCoordinate.longitude + lon);annotation.title = @"绿";[annotations addObject:annotation];}[self.mapView addAnnotations:annotations];
实现 <BMKMapViewDelegate> 协议中的 mapView:viewForAnnotation:回调函数,设置标注样式。代码如下所示:
#pragma mark - BMKMapViewDelegate- (BMKAnnotationView *)mapView:(BMKMapView *)mapView viewForAnnotation:(id<BMKAnnotation>)annotation {BMKPinAnnotationView *pinAnnotationView = (BMKPinAnnotationView *)[mapView dequeueReusableAnnotationViewWithIdentifier:annotationViewIdentifier];if (!pinAnnotationView) {pinAnnotationView = [[BMKPinAnnotationView alloc] initWithAnnotation:annotation reuseIdentifier:annotationViewIdentifier];}if ([annotation.title isEqualToString:@"红"]) {pinAnnotationView.pinColor = BMKPinAnnotationColorRed;// 强制展示pinAnnotationView.isForceDisplay = YES;} else if ([annotation.title isEqualToString:@"紫"]) {pinAnnotationView.pinColor = BMKPinAnnotationColorPurple;// 最大展示级别pinAnnotationView.displayMaxLevel = 19;// 最小展示级别pinAnnotationView.displayMinLevel = 10;} else {pinAnnotationView.pinColor = BMKPinAnnotationColorGreen;}// 开启碰撞检测pinAnnotationView.isOpenCollisionDetection = YES;return pinAnnotationView;}
效果如下:

上一篇
下一篇
本篇文章对您是否有帮助?